DIY Farmhouse Coffee Table Makeover
- J. Dustin
- Jun 21, 2018
- 10 min read

A few months ago I drove down the street I currently live on and discovered this little shop called "The Shed at Coal Creek." While I was driving by I noticed a cute little coffee table sitting outside. I had my eye on that table for a few days and finally had time to go and purchase it for $30.
The coffee table was in need of some help. It was really weathered! The paint was chipping off in large sections, the wood on top was separating, and there were cobwebs all over the base.
I took the coffee table home with me in hopes of starting this big project sooner, but I had to wait a few months until I finished and graduated from nursing school! I am now officially a college graduate with my Bachelors in Science of Nursing! Once I graduated I had extra time on my hands and got to work on the coffee table.
Here are some pictures so you guys can see what I had to work with.
You can see on this picture that the wood was splitting apart from being weathered.

The paint on the legs was coming off in pieces and was also weathered. Some places were yellow and had deep cracks in the paint.


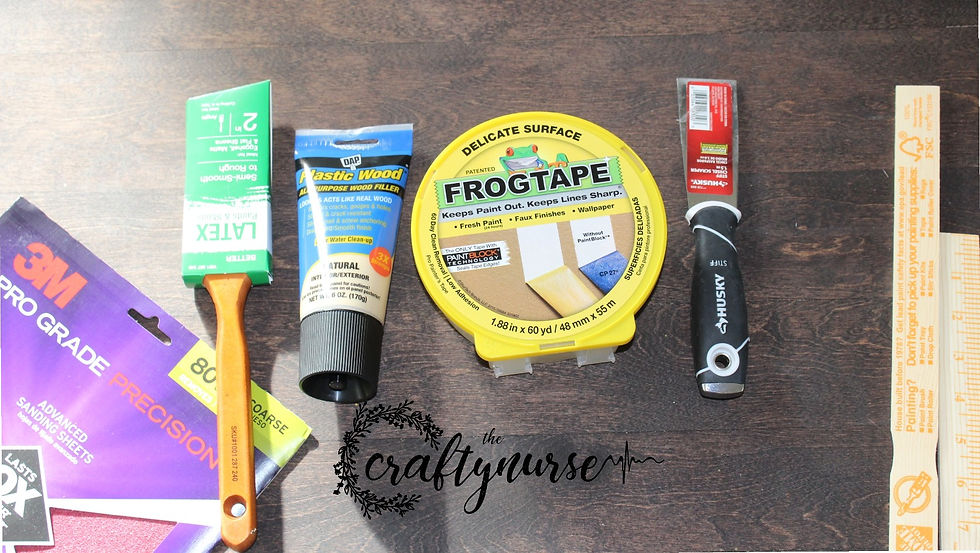
After assessing my table top to bottom, I decided that I needed to gather my supplies. Everything that I used I purchased at HomeDepot for a total of about $100... I wasn't expecting it to cost that much, but I wanted the best supplies to help my table last.
Supply List:
~ Minwax polyshades stain and polyurethane in 1 step, espresso stain
~ Minwax water based polycrylic protective finish, clear semi-gloss
~ Behr premium plus interior stain enamel paint and primer in 1, interior
satin enamel (I LOVED this paint! It went on smooth and is for indoor and even outdoor use.) recommended
~ Paint sticks and keys

~ Frog tape for delicate surfaces
~ Plastic wood all purpose wood filler
~ Latex paints and stains paint brush, semi-smooth to rough
~ Stiff Chisel Scraper

~ 80 grit (coarse) and 400 grit (x-fine) pro grade precision sanding sheets (Make sure to check your stain and finish products for the grit.) recommended

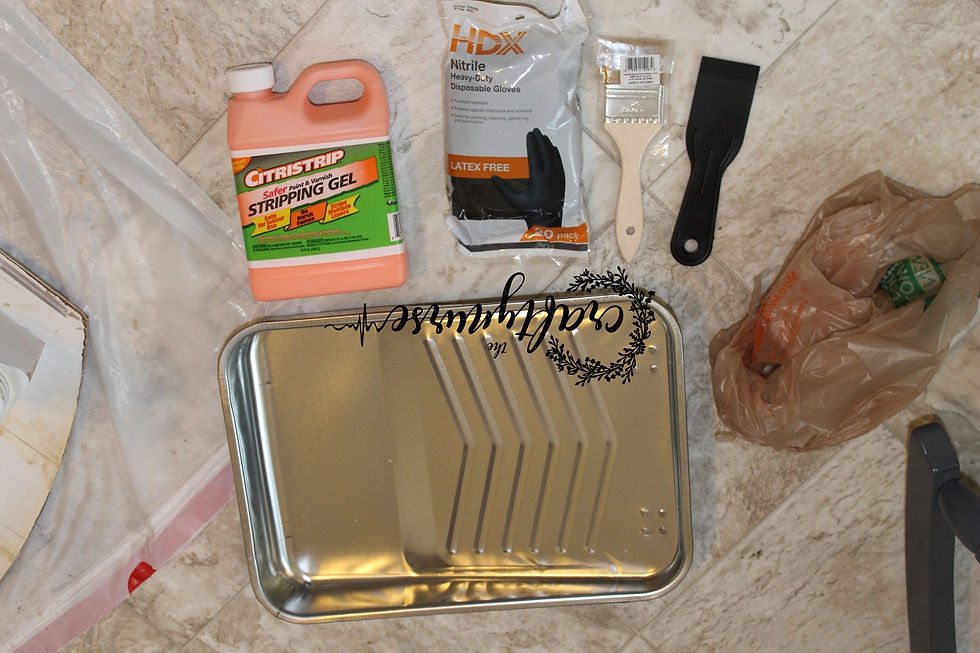
~ Latex free Nitrile Heavy Duty Disposable Gloves (protects your hands from the paint stripper. It is a pretty harsh chemical)
~Citristrip Stripping Gel (safe for indoor use! Plus it had a great smell. This brand was one of the cheaper ones, but I liked that it is safe to use indoors.)
~ Plastic scraper (to scrape of the stripped paint)
~ Metal paint pan (recommended for stripping. Again paint stripper is a harsh chemical.)
~ Foam paint brushes in various sizes

~ Best paint brush with angle cut small and medium sizes
(I learned that paying a little extra for the best paint brushes is really worth it. It made each brush stroke look so much smoother, caused little to no problems in comparison to the foam and cheaper similar brushes.)

~ Garbage Bags and plastic grocery bags
This project took me a total of 7 days to finish due to drying times.
Day 1:
I started by Cutting two garbage bags to lay out on the floor. I didn't have or think to purchase one of those big plastic paint covers, so i made-do with what I had.
Next I started by wiping down the whole table. Because it was outside for a month or more, there was lots of cobwebs and dirt on it.

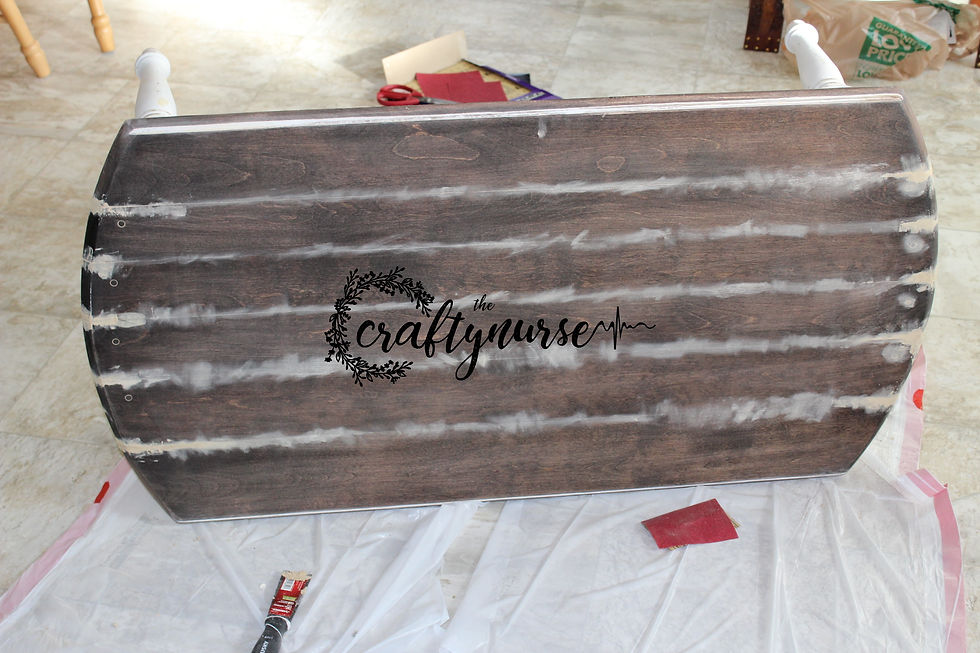
Earlier in this post I mentioned that the wood was splitting apart on the top of the table. Wood Filler works great for this, but you HAVE to allow for adequate drying time. The instructions on the brand that I used states the following: Allow 2-6 hours for shallow filling and up to 36 hours for deeper fills. I think I let the thin fillings dry for about 2 hours and the deep I did allow to dry for 36 or even more because it took so long to strip and sand the base.

The wood filler has a putty-like consistency. I found that using my fingers was actually easier for the shallow sections rather than the Chisel scraper. I would squeeze a little of the filler onto my finger and work it into the wood, adding more filler as needed.


For the areas where the wood was split all the way through, I prefered using the chisel scraper to make sure the filler got all the way through. I also used my fingers to smooth and pack as much filler as I could in the separated areas. One lesson I learned was to allow some time for the filler to dry and apply more to fill other gaps and holes that you may have missed.


While the wood filler was drying I started to work on stripping the paint off the base of the table.

After flipping the table upside down, I started by getting all of my supplies ready. AFter donning my super stylish black latex gloves I opened the paint stripper and poured a small amount into the metal paint tray. Then I used one of the cheapy paint brushes to paint a layer of the stripper onto the paint I wanted to remove.


I learned that it works better if there is a pretty generous amount applied. This helps the stripper to not dry and actually do its job. I ended up having to do about two good coats of the stripper to get down to the wood. From the images above, the darker orange application worked so much better.
AFter I covered all of the old painted areas, the instructions on the stripper stated to let it sit for at least 30 minutes before removing. While I was waiting and monitoring the process I noticed that some of the old paint was starting to have a bubbling texture and appearance (see circled areas).

after patiently waiting, I decided to test a small area and see the paint stripper was working! Using the plastic chisel scraper I gently scraped off a small section. Wow, paint stripper is amazing. I began working my way around the table and scraped of all of the paint and stripper. I used a plastic grocery bag to place the stripper and old paint in. Remember to wear gloves! I ended up going through a few pairs because the paint stripper actually made holes in the gloves I was using.

Once the first coat of paint stripper was removed, I decided I needed to repeat the same process because of how much paint was still on the table. After I got done cleaning off the second coat of paint stripper, I used an old damp rag to remove any excess stripper that i had a hard time removing with the chisel. This helped a ton!!! I was glad to finally be able to see the real wood.

Day 2: SANDING
Day 2 was the big sanding day! Once the wood was dry, the old paint was removed, and the wood filler was dry I began to sand. I started with the coarse 80 grit and sanded all of the surfaces. After I sanded with the 80 grit I used the fine 400 grit.
Make sure when you are sanding to SAND IN THE SAME DIRECTION AS THE GRAIN! This is super important because if you don't, it will show up after you stain. According to Popular Woodworking Magazine, "Sanding cross-grain tears the wood fibers so the sanding scratches show up much more, especially under a stain. The best policy is to always sand in the direction of the grain when possible. The scratching that does occur is then more likely to be disguised by the grain of the wood."
If you are confused what the direction of the grain means, Below is a picture that shows you.


Make sure that when you are sanding to get in all of the nooks and crannies. I found that folding the sandpaper in half helps to get into the smaller and more difficult areas.


Once all the sanding is done, I used a vacuum to help pick up extra dust and wood. I also learned after the fact that using a cheesecloth is a really easy and efficient way to pick up all of the dust and other particles. I also used a damp old rag again to make sure there was no dust left behind. it is super important to make sure there is no extra particles, sand, and even hair on the wood because once you paint or stain it, it stays there.
After I sanded I was super excited to start staining the table! I turned the table right side up and again checked for any dust and wiped with a damp rag.
DAY 2 & 3: STAINING
Make sure that you read and understand the instructions of the type of stain you are using. I purchased Minwax polyshades stain and polyurethane in 1 step, espresso stain, from Homedepot. I went with the smallest can because my table was small. This particular stain doesn't require you to wipe it off after you apply it.
Make sure you wear old clothes if by some chance you get it on yourself. You can also wear latex gloves if you want. I wish that I would have at least worn gloves because I ended up getting some of the stain on my hands (which took forever to get off).
Also, If you decide like I did to do this inside, make sure to open windows and ventilate your home. The stain smell gets pretty strong.
When you are ready to start staining, open up the can by using a paint key. Then using a paint stick stir the stain well. Once you have finished stirring you are ready to start staining.

Because my table was small, as well as my paint brush, I dipped the brush into the stain can. I found it easier to squeeze the bristles of the brush inward as I put it in the can.
*Make sure to start small with the stain. A little bit goes a LONG ways.
* Make sure to use brush strokes in the same direction as the grain, just like sanding.
Stain takes a while to dry, so you can brush over areas again to smooth and even them out.
I started to stain my table top working one side to the other. Once the whole top was done, I ended up just brushing over the whole surface to make sure there were no air bubbles and to keep the surface as smooth as possible. the Can recommended to actually hold the table at a 45 degree angle and brush over the whole surface.

For the sides and rounded edges I used downward strokes that followed the curvature of the table. Make sure that there are no thick areas from the stain running down the sides!

Once the first coat of stain was applied, I let it dry. The stain instructions stated to wait at least 6 hours before applying another coat. It was suggested to do a total of 2 coats and if the desired color was darker, to add an additional coat. Since the color I was using was espresso, two coats was perfect for what I wanted.

Once the top stain was dry, I flipped the table over to stain the bottom. Using the frog tape, I taped around the base that I didn't want any stain on. I found that smaller pieces are easier to work with when applying tape to furniture. Make sure to get as close to the "seam" as possible!

After I had taped the table, I used the same steps as above and stained the base. Make sure to not let any stain drip over the edges onto the top side. If it does happen gently wipe off the excess with an old rag or paper towel.

As I am remembering this step in the process, I am realizing that I may have actually only done one layer of stain on the base of the table... Woops. :)

After the stain is dry, remove the tape. I would suggest wearing gloves to prevent any undried stain from the tape getting onto your hands. I didn't realize I even had any on me until it was too late. Luckily I didn't get any on my clothes, but I had stain on my hands for a few days.
DAY 4 & 5: PAINTING
As soon as I got up on day 4 I was super excited and eager to start painting! I started by taping the stained areas. I would strongly suggest covering all of the stained areas in case by accident that your white paint drips onto it. (Learn from my experience!)


I have decided that I really like frog tape! I tested a small piece of it on the stained area to see how well it worked, and nothing came up when I removed it. That tape is definitely worth the purchase.
AFter all of the underside of the top was taped, I opened the paint can and stirred the paint well with the paint stick. My foam paint brush fit in the opening, so I dipped the brush into the paint can rather than pouring it out. And then I finally begain painting!


After the first coat, I started to realize that my foam paint brushes were falling apart and not working as well as I had hoped... So I took, yet again, another trip to Home Depot to purchase the best paint brushes.

The difference in these brushes vs. the foam brushes was unbelievable! The paint went on smoother and I was able to get into the nooks and crannies so much easier. I liked having two different sizes of paint brushes because it made the paint job easier.
I ended up painting THREE coats of paint on the table, and I am glad that I did. I feel that three coats was just enough. Painting didn't take as long as the staining because the paint actually dried faster than I was planning! The can recommended 2 hours, but I waited for 4 to make sure it was completely dry.

After the final coat was dry, I took off the tape and let it sit overnight to allow adequate drying time before I brushed on the finish coats.
Day 6 & 7: Finishing
The finish I used had a "skim milk" consistency. While reading the directions the can instructed to stir well and after each application, except the last, to sand with 220 grit sandpaper in the direction of the grain.

After stirring I was ready to brush on the first coat on the bottom. When you are "Painting" the finish, make sure that you brush on a thin layer and watch for areas it could have ran down the sides or groves. It is harder to fix after it is dry.

The primer recommended adequate drying time before sanding and applying another coat. When sanding make sure to go over every inch of the stain and paint or else the sections you miss will show up on the next coat of primer.

I allowed the primer to dry for about 12 hours before placing my table where I wanted it.

I am in love with how it turned out and continually get comments about how nice and beautiful it looks! I enjoy having the table in my home and enjoying my fun and useful project. This was definitely one of the most time consuming and learning projects I have done so far, but I learned so many skills and can't wait to try some other furniture make overs!


I am in love with this table! I am constantly getting compliments on how nice it looks. I haven't started to tackle another furniture makeover yet, but when I find the right piece I can't wait to get started!
Happy crafting,


Comments