DIY Burlap School Spirit Wreath
- J. Dustin
- Oct 11, 2017
- 4 min read

Since it was homecoming week last week, I teamed up with Jenna and the SUU University Journal to create this amazing school spirit wreath! Burlap wreaths are a simple and elegant way to add to your home. The process is simple and takes less time than you would think.
Here are the supplies that you will need:
~ Burlap (we got 1.5 yards)
~ Red Ribbon
~18" wreath frame
~ Scissors
~Hot glue and glue gun
~Dowel
~ SUU flag (We got from the school bookstore )
~sewing pins

start by cutting the burlap into strips. The following pictures show a simple way that Jenna discovered to cut the burlap by watching one of the employees at Joann in the fabric section. It is pretty genius!
fold one of the ends in until you have your desired thickness and use a pin to mark it.

Next Keeping the pin in place, use a pair of scissors to cut one strand of the burlap that you marked preiously. you can remove the pin after the strand is cut.

Once cut, pull the strand out. It does tend to bunch but we found that holding down the burlap makes the strand easier to remove.


After we pulled the strand out, It left a bigger section to see so we could cut it easier. We saved a few of the strands to use later for our wreath.

You can see in the picture above what the burlap looks like with one strand out. It makes cutting the burlap so much easier! NOt to mention straighter as well.
continue to follow the same pattern until all of the burlap is cut.

Throughout the rest of this, I am going to talk about the sections marked in the picture below as horizontal and veritcal.

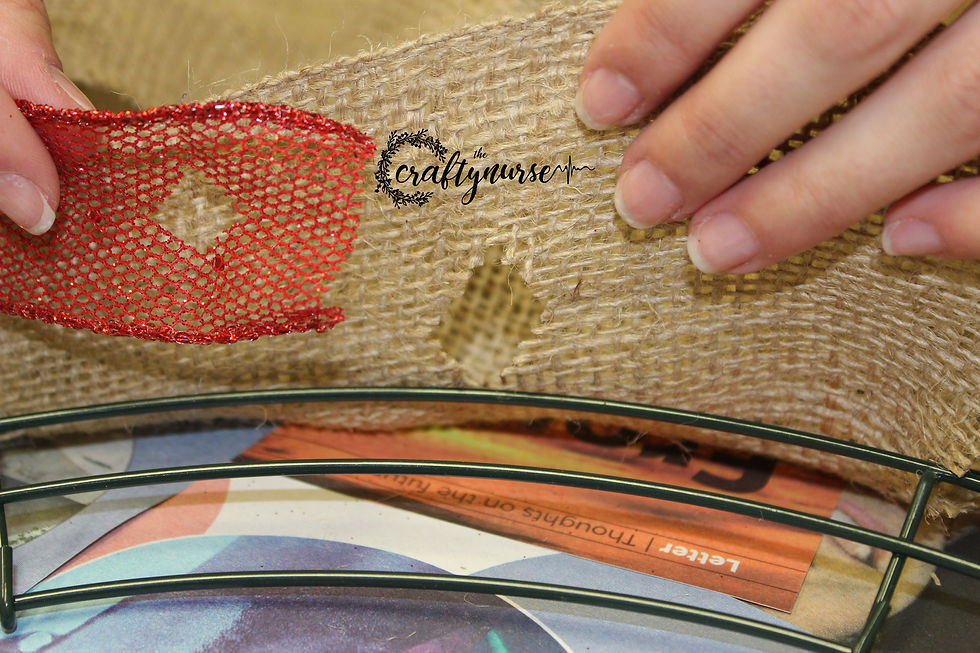
For this wreath we wanted to use burlap along with ribbon. After doing some research we found that connecting the burlap and ribbon together makes the process much easier. So we cut holes in both and using one of the strands we pulled out earlier we tied them together.


Once the ribbon and burlap were tied, we trimmed the excess strand.
Next feed the burlap/ribbon through one of the "horizontal" sections of the wire wreath frame. Once the top is through, glue the top of the burlap down to form a loop around the section of the wire frame to secure it.


Once the glue has dried, start feeding the ribbon and burlap through.
We started with the ribbon. for our pattern we had the ribbon go in a zig-zag pattern between the burlap: top, Middle, Bottom, Middle, Top, Middle Bottom, etc.
the next set of steps will be repeated until you go around the entire wreath.
To start, make a loop in the ribbon between the first and second horizontal wire sections like the following picture below.

Next tuck, not feed, the burlap up through each section in the wreath. The picture below shows what it should look like. Note that you will not be weaving the burlap over and under the horizontal wires.

after tucking the burlap through each section, slide that section over to the vertical divider.

While holding the section, twist the back of hanging burlap and ribbon tightly. This helps hold each section from falling apart. If needed you can flip the wreath over to make it easier.
Once you have made the twist, begin tucking the ribbon and burlap through the long "Horizontal" sections again finishing the step with a twist.
After you have done these steps three times you should be close to the "vertical" divider. Start your next section on the other side of the divider and continue the process.

Keep repeating this process through the whole wreath. Remember to rotate the ribbon if you are using any.
For each of the vertical sections of the wire wreath we did three burlap and ribbon sections following the above steps.
When the sections of burlap are close to running out, hot glue a new piece on. With the ribbon we were using, we had more than enough and didn't need to glue on any extra.

The following picture shows what this process should look like after few burlap sections.

Keep continuing the process until you have made it completely around the frame.
When you have finished and made it around the whole frame, trim of the excess ribbon and burlap.

once trimmed use hot glue to glue the end of the burlap and ribbon, around the wire, on to the burlap above.


Once the glue has dried pull and "fluff" the burlap and ribbon. This helps make everything look even. The ribbon that we used was wired, so we were able to shape it how we wanted.


After we arranged the burlap and ribbon, we added our final touches with our school flag. We cut a dowel and hot glued it to the back of the flag to strengthen it and make it less floppy. We may or may not have cut the dowel with a pocket knife... :)

Then we glued the flag using hot glue to the wreath.


and there you have it. This wreath was super fun and simple to make.
It took us about 1.5 hours and costed around $20! I really like how simple and fun this wreath was.

Don't forget to leave a comment below! I would love to answer questions and hear your feedback.
I am currently working on another project that involves string and nails and I am excited to share it with you guys!
Happy Crafting!


Comments